Before we get started on today's post I just want to give a big huge virtual hug to you all for following along and supporting me here at Restyle it Wright. I'm having so much fun sharing DIY and home decor tips with you all and it wouldn't be nearly as much fun without my readers and your sweet comments and emails. So thank you thank you!
Now, back to a little DIY fun.
So, you could probably say I'm a hoarder of home decor finds. But not like those shows where people are buried beneath piles of garbage, clothes, and everything else (which is so sad). I do have myself an eclectic little collection of items that I've picked up at yard sales, thrift stores, and antique markets that are just waiting for their debut. And this little DIY gem happens to be pulled from that collection which is a huge win in my book...once less item in the stash and one more piece that brings me joy in our home.
Without further ado I bring you my gold & chic mirror makeover! (Seriously the EASIEST DIY ever).
So this all starts with a $4 mirror from a thrift store. It's not very big at about 10x10 but I just loved the shape and sturdiness of this mirror and the fact that it was solid wood was a huge plus. I knew it would either make a great addition to a gallery wall or would be fun as a tray. Either way my $4 investment would be put to good use.
Here she is in her original condition:
There are some black marks on the glass because it's old, but hey it adds character right?
Here's what you'll need to complete this DIY.
(If you don't have an old mirror to update this target one is an option)
A 3 item supply list?! What What?! Raise the roof.
Here are the steps:
Step 1: Wipe off the mirror and wood to make sure there is a nice clean surface to work on.
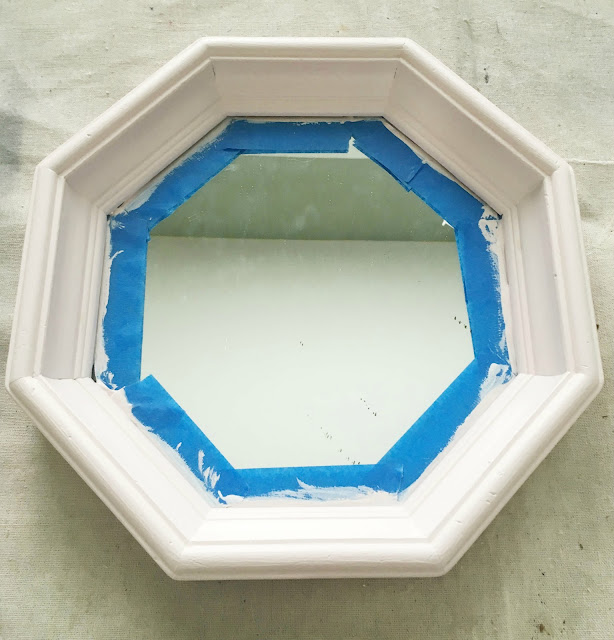
Step 2: Time to do something about that wood! Some people may prefer to sand the wood as their is a bit of a shiny finish. I've had such great success with my primer that I find their is no need to sand. But you certainly can if that's your preference! So for this step I taped the glass and applied two coats of primer to the wood.
Here's how it looks after the first coat of primer:
I don't have a picture after the second coat of primer but you get the idea.
Step 3: Apply paint! I have 8 millions sample paints in our basement from various projects. The Sherwin William sample paint containers are HUGE and can easily work for small projects like this. I've used them several times in this way and I've never had an issue with the quality of the paint. I happened to have a pot of SW "White Dogwood" when we were testing door colors so that's what I used. I knew I wanted to do a pink of some sort (shocker) and this was the perfect shade. So after two coats of the sample paint she was looking mighty fine.
Isn't it the prettiest pale pink? If you're in the market for a nice light pink I highly recommend this one! The mirror actually would have been just fine to leave alone right here. It's clean and simple and oh so pretty. But, when have I ever just left something alone? She needed a little glam! I knew I wanted to do something fun and then it hit me to grab a gold sharpie! I figured, hey if I don't like it, I'll just paint over it!
So....
Step 4: Grab your gold sharpie and go crazy! Of course make sure your paint is dry first! I just wanted a touch of gold so I stuck to the inside rim of the mirror. I also kept the tape on the glass to avoid getting marker on the mirror.
Step 5: Remove tape and clean up the glass. I took an exacto knife to remove the tape and to scrap off any residual paint that slipped under the frame onto the glass. Another option would be to put a coat of poly on the mirror but since this will hang on a wall I didn't think it was needed. If you plan to use this as a tray I would definitely protect it with a coat of polyurethane.
Once I got all around and removed the tape she looked like this:
So cute!
Total cost for this quick little update $4 (of course more if you had to buy paint and a sharpie)
Total time spent one day while the kids were at school. Most of the time was spent waiting for paint to dry!
This fun little mirror will be making an appearance in an entry way gallery I'm putting together but for now I temporarily placed it here.
I just love this quick little update! It seriously couldn't have been easier...or cheaper! But what an impact!
Has anyone else whipped out a gold sharpie for a furniture/decor makeover? It's life-changing I promise. Have a great weekend!


Beautiful and creative and looks lovely on the wall. The gold strip is a great addition. It is amazing how paint could transform anything to what we want it to look like.
ReplyDeleteWow Colette, the mirror looks so beautiful! I can't believe that you really only needed 3 items to get this job done! Thank you so much for sharing, I am currently working on a mirror for our guest bedroom and I love the tips you shared.
ReplyDeleteI love painting over things that I don't like the color of! I love that you used a gold sharpie to add the trim around the mirror. I've never used a sharpie that way but black sharpies work wonders to cover up scuff marks on furniture! ;)
ReplyDeleteI love simple DIYs where one-two coats of paint completely changes the look of the piece. I like it without the gold sharpie, too! But, it's very "you" with the added glam :)
ReplyDeleteLove a simple project. The gold is a great touch :)
ReplyDeleteI love this! It's simple but makes such a huge impact, so creative!
ReplyDelete